The class took the opportunity from the much improved weather conditions to go outside and test some of the ways of gathering field data we had discussed in the unmanned aerial system mission planning assignment and throughout class . It was simply to see some of the ideas put in to basic practice.
We tested 3 methods of collecting aerial data unmanned with 4 different equipment types. With no specific project set or in mind, other than to capture some images from above where we were, there were no specified attributes to be analysed.
Study Area
We needed an area, that would be fairly clear of people and buildings in order not to invade people's privacy and to have the are beneath clear of people in case the instruments should fall. We used the green area outside Eau Claire's indoor sport's centre and soccer park, as shown in figure 1. It is a flat area covered in grass, with the areas of tarmac for the car park.

Figure 1: Green space in Eau Claire's soccer park used for our aerial imaging.
Methods
The first method we looked at was unmanned aerial vehicles, where we tested two different types of remote control rotor copters. Each had on board cameras and GPS devices as well as the operational circuit boards. One had three large "legs" (figure 2) and another with smaller "legs"(figure 3). The first one was its first launch, and so when it was flown it was slightly less stable as it calibrated to where it was (figure 4). The second had been flown many times and so was more stable and was able to get more where it was directed.

Figure 2: The first rotor copter that was used to capture aerial images in the field.

Figure 3: The second rotor copter that was used to gather aerial images whilst in the field.

Figure 4: The slightly less stable first rotor copter calibrating on it's first flight.
We also tried a more basic method of a kite, we assembled the kite (figure 5) then attached the belay device and cast it until it was at about 100 feet (figure 6). A camera was then attached to a form of hamper device and attached to the kite string, and then the kite was cast higher in order for the camera to become high enough to take images. (figure7)

Figure 5: Assembling our kite before flying it to gather data from the air.
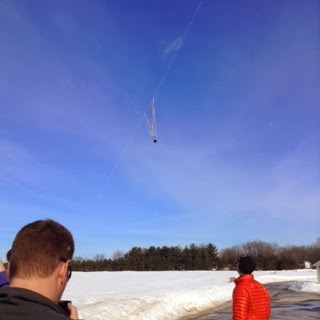
Figure 6: The camera once attached to the kite string being sent up in to the air.

Figure 7: The kite and attached camera high up during data collection.
The third method we tried was using a rocket with two micro cameras attached to the side. These were very small lightweight cameras as was the rocket, and so were attached to the sides of the craft with industrial tape (figure 8). The rocket was electrically powered and so had a fuse device to set it off with. (figure 9)

Figure 8: Attaching the small cameras to the sides of the rocket.

Figure 9: The rocket we were using in the field before setting it off, the wire can be seen which lead to the control button.
Discussion
The rotor copters were by far the most technical advanced, and as such could cover a much wider are much faster, both made use of the emergency device in which the on board G.P.S. unit will direct it back to it's starting position on the ground should control be lost, which I felt was a really good design feature. It also had a device on it that made sure the camera was always in the same steady and stable position which is useful in being able to get high quality comparable images.
If money was an issue in a project or technology, as it so often does fails, then the kite it is a good alternative method. However, it does require the right conditions to be able to fly, and it was relatively quick to set up and deploy.
The rocket launch did not work particularly well for us, and we have yet to see if the cameras were able to catch any stable images which is questionable given the speed of the device.
The results of the photos fro the kite worked well. As it was not positioned extremely high up and we did not walk around with it, only the area directly above us and a little bit around us was covered, but the quality of the picture is good. One of the best images from the days can be seen below in figure10, where the snow covered playing fields, the outbuilding and our group can be seen.

Figure 10: Aerial image taken with the sue of a kite of the area directly above the class.
Conclusion
It was really good to be able to go out in to the field and put in to practice some of the methods that we had spent to long talking about and researching and learning,a little about the technologies and the processes that go in to actually using them. It is good to have a variety of different methods to use in case one does not work, or the project does not dictate that such advanced technology is necessary.
No comments:
Post a Comment